There’s something undeniably magical about transforming a simple ingredient into a luscious, creamy delight with your own two hands. Welcome to the enchanting world of homemade butter-where all you need is a jar, some fresh cream, and a little patience to churn your way to golden perfection. In this article, we’ll unlock the secrets of “Churn Charm,” guiding you through the art of crafting rich, velvety butter right in your kitchen. Say goodbye to store-bought spreads and hello to the satisfying ritual of shaking your own jar of buttery goodness-because sometimes, the best things come from the simplest acts.
- Prep and Cook Time
- Yield
- Difficulty Level
- The Art of Selecting the Perfect Cream for Creamy Butter
- Mastering the Jar Churn Technique for Consistent Results
- Enhancing Flavor and Texture with Natural Add-ins
- Storing and Using Homemade Butter to Maximize Freshness
- Ingredients
- Instructions
- Tips for Success
- Serving Suggestions
- Q&A
- To Wrap It Up
Churn Charm: Crafting Creamy Homemade Butter in a Jar
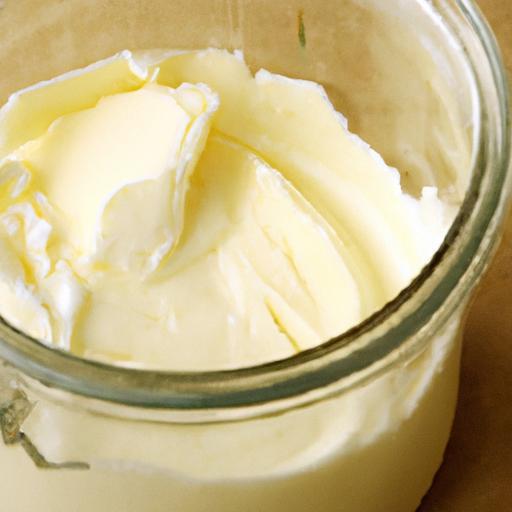
Churn Charm begins with the simple magic of turning fresh cream into luscious, silky butter using a trusty jar. This timeless kitchen ritual not only reconnects us with ancestral traditions but also lets you control the flavor and texture of every pat. There’s something truly satisfying about watching thick cream transform into golden butter, a process that invites patience, creativity, and a love for wholesome ingredients.
Prep and Cook Time
Preparation: 10 minutes
Churning Time: 15-20 minutes
Total: 30 minutes
Yield
Approximately 1/2 cup (113 grams) of fresh homemade butter
Difficulty Level
Easy – perfect for beginners and seasoned cooks alike
The Art of Selecting the Perfect Cream for Creamy Butter
Success starts with the cream. For the richest, creamiest results, choose high-quality, fresh heavy cream or whipping cream with at least 35-40% fat content. Organic or locally sourced cream often boasts a fresher taste and fewer preservatives. Avoid ultra-pasteurized cream if possible, as it can dull butter’s flavor and slow down the churning process. Full-fat, fresh cream is the heart of Churn Charm, bringing a decadently smooth finish and subtle natural sweetness to every dollop.
Mastering the Jar Churn Technique for Consistent Results
Grab a clean, sturdy glass jar with a tight-fitting lid (quart size works best). Pour in your cream, filling halfway to leave room for air and movement. Seal the lid firmly and prepare for a rhythmic dance of shaking. To keep the process steady, hold the jar close and shake vigorously, mimicking the slow, steady churning of traditional butter churns.
You’ll notice the cream first turning thick like whipped cream, then starting to separate into buttermilk and tiny golden curds. When you feel the heavier clumps around the jar sides and hear a sloshing of liquid, that’s your signal that the butter is forming beautifully. Drain the buttermilk to use in baking or marinating, then rinse your newly formed butter under cold water to firm and wash away any residue.
Enhancing Flavor and Texture with Natural Add-ins
Churn Charm shines best when personalized. While plain butter is divine, enhancing it with natural add-ins can elevate both taste and texture. Incorporate a pinch of fine sea salt for a classic touch or experiment with fresh herbs like chopped chives, basil, or rosemary.
For a luxurious twist, blend in honey, crushed garlic, or even a sprinkle of smoked paprika. These additions create layers of flavor and make your homemade butter a standout accompaniment. Add your chosen ingredients during the final kneading step for an even distribution.
Storing and Using Homemade Butter to Maximize Freshness
Once crafted, shape your butter into a neat ball or press it into a decorative mold for visual appeal. Wrap tightly in wax paper or store in an airtight container-refrigerate to maintain freshness for up to two weeks. For longer storage, freeze butter in small portions to thaw as needed, preserving the creamy charm of your effort.
Use this butter lavishly: spread it on crusty bread, melt over steamed vegetables, or finish grilled dishes with a spoonful. The freshness and custom flavor profile of homemade butter invite you to savor every bite, enhancing simple meals with homemade magic.
Ingredients
- 2 cups fresh heavy cream (35-40% fat, not ultra-pasteurized)
- 1/4 teaspoon fine sea salt (optional)
- Fresh herbs (such as chives or rosemary), honey, garlic, or spices for add-ins (optional)
- Ice water, for rinsing
Instructions
- Chill your cream: Place the cream in the refrigerator for at least 2 hours. Cold cream yields better, faster butter.
- Fill the jar: Pour the chilled cream into a clean quart-sized glass jar, filling it halfway to allow space for shaking.
- Seal and shake: Screw the lid tightly and shake the jar vigorously for 10-15 minutes. Pause occasionally to check consistency.
- Detect separation: You’ll notice the cream thickens, then separates into clumps of butter and liquid buttermilk. The sloshing sound means butter has formed.
- Drain buttermilk: Pour off the buttermilk into a separate container (great for baking or drinking).
- Rinse the butter: Add ice-cold water to the jar. Shake gently to wash the butter, then drain. Repeat until water runs clear to keep butter fresh longer.
- Knead in flavorings: Transfer butter to a bowl. Add salt and any optional herbs or flavorings. Knead with a spatula until evenly combined.
- Shape and store: Mold your butter, wrap in wax paper, or place in an airtight container. Refrigerate or freeze to enjoy later.
Tips for Success
- Patience pays off: Shaking butter can take time; keep your rhythm steady for uniform results.
- Jar choice matters: A wide-mouth jar offers better mobility for cream to churn.
- Don’t overfill: Space in the jar is crucial for agitation.
- Use buttermilk creatively: Incorporate leftover buttermilk into pancakes or dressings for zero waste.
- Test fresh cream sources: Taste and quality vary; local dairies often offer richer options.
Serving Suggestions
Serve your homemade butter softened with crusty artisan bread, freshly baked rolls, or warm corn on the cob. Garnish with a sprig of rosemary or chive blossoms for visual appeal and an aromatic lift. Drizzle a little honey-infused butter over roasted root vegetables or melted into scrambled eggs for a breakfast that dazzles.
| Nutritional Info (per 1 tbsp) | Calories | Protein | Carbs | Fat |
|---|---|---|---|---|
| Homemade Butter | 100 | 0g | 0g | 11g |
| Optional Sea Salt | 0 | 0g | 0g | 0g |
Discover local cream sources for the best Churn Charm experience and techniques rooted in tradition. For scientific insights into butter chemistry and healthy fats, visit Healthline’s detailed guide.
 crafting creamy homemade butter in a jar” class=”aligncenter” />
Q&A
Q&A: Churn Charm – Crafting Creamy Homemade Butter in a Jar
Q1: Why make butter at home when I can just buy it at the store?
A1: Ah, the allure of homemade butter is more than just nostalgia! Churning your own butter transforms a humble ingredient into a textured, flavorful delight. It’s fresher, customizable with herbs or spices, and connects you to age-old culinary traditions. Plus, the satisfying jar-shaking dance can be quite the stress reliever!
Q2: What’s the secret to perfect homemade butter in a jar?
A2: The magic lies in quality heavy cream and a bit of patience. Use chilled, fresh cream for the best results. Shake the jar vigorously but steadily-about 10 to 15 minutes. You’ll first get whipped cream, then the curds will separate from the buttermilk. When the butter clumps form, you’re golden!
Q3: How do I know when my butter is ready?
A3: Watch for that delightful moment when the cream turns grainy and lumps of butter start to thud against the jar walls. The buttermilk will pool around it like a pale river. When the butter solidifies into a creamy mass and you can no longer hear liquid sloshing freely, it’s time to drain, rinse, and knead your butter.
Q4: What should I do with the leftover buttermilk?
A4: Don’t toss that tangy treasure! Use your homemade buttermilk in pancakes, biscuits, dressings, or marinades. Its creamy zip adds brightness and tenderness to baked goods, elevating them with a subtle richness you won’t find in store-bought mixes.
Q5: Can I add flavors to my butter?
A5: Absolutely! Before the final kneading, stir in sea salt, fresh herbs like chives or dill, crushed garlic, or even a dash of honey. Each blend turns your butter into a unique culinary star, perfect for spreading on warm bread or melting over steamed veggies.
Q6: How do I store homemade butter?
A6: Wrap your buttery goodness in parchment or store it in an airtight container in the fridge. It will keep fresh for about two weeks. For longer stints, freeze portions wrapped tightly-they thaw quickly and preserve that creamy charm.
Q7: Is making butter in a jar kid-friendly?
A7: Certainly! It’s a fun, hands-on kitchen adventure for all ages. Kids love the simple transformation from cream to butter, learning a little science and craft simultaneously. Just remind them to grip that jar tight and shake with joyful vigor!
Embrace the churn charm and bring a little homemade magic to your kitchen with creamy, fresh butter made right inside a humble jar. It’s old-fashioned fun with delicious, buttery rewards!
To Wrap It Up
As the last drops of buttermilk settle, and your creamy butter takes its perfect shape, you’ve not only crafted a deliciously fresh treat-you’ve unlocked a timeless tradition right in your own kitchen. Churning butter in a jar is more than a simple kitchen hack; it’s a tactile journey connecting you to the roots of homemade goodness. So next time you crave that rich, silky spread, remember: the secret is right at your fingertips, ready to transform humble cream into golden delight. Embrace the churn charm, and savor the simple magic of homemade butter-one jar at a time.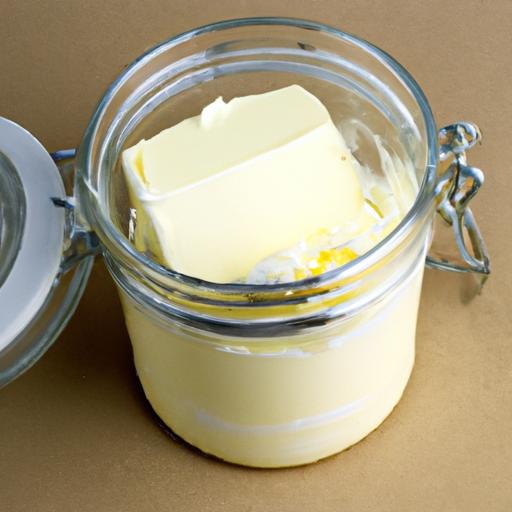


